Tuesday, October 26, 2010

You can't beet that!


I don't exactly know where beets ended up getting a bad name. They are one of the tastiest little things in the world, especially when they are fresh. I am guessing that the little purple circles that make their way into the lineup at the Sizzler salad bar are what have turned most people off. Yeah, those are not that good....but they come from a can! Get a hold of some fresh beets, and you have a double delicious treat. The bulbs are great when you steam them (about 25-40 minutes depending on the size) and you get the greens! A bunch of beets, complete with the greens only cost about $2 right now at Henry's Market and they are ORGANIC. Here, I used them two ways. Steamed golden beets are peeled and sliced, and drizzled with just a little bit of butter and salt. They have a wonderful flavor that is all their own. The chopped greens were sauteed with onions, olive oil, sea salt, and red pepper flakes. This was all laid upon a bed of quinoa (a grain that is actually related to the beet and spinach family) and served with a nice garnish of New York steak.

Oh, the joys of fall.

One of the wonderful things that start to make an appearance in the fall are "winter squashes". These wonderful things are known by this somewhat misleading name because they are built to last through the winter, not because they grow during the cold months. In fact, these rather hardy squashes take a rather long time to grow during the summer months. What sets them apart from the summer squashes (like zucchini and yellow crookneck squash) is that they have a very hard, thick skin. This skin is cured a bit by letting the squash sit out in the sun once it is ripe. What you are left with is a fabulous vegetable that you can store at room temperature for months at a time....virtually all winter! So, if you have the storage space, buy them up as they reach rock bottom prices during the fall. They have diverse names, like Acorn, Delicata, Spaghetti, Butternut, Table Queen, Banana, and many many others. Cooking these basically involves the same process, no matter what you choose for your table. You cut the squash in half, remove the seeds and pulp, and then put them in a pan with 1/4 inch of water, flesh side down. Bake them at 400 degrees for about 30 minutes. Then, you can scoop out the flesh, or leave it in the shell to serve. An easy way to season them is to turn them flesh side up, sprinkle some brown sugar, salt, pepper and cinnamon in the hollow and put them back into the oven for 5 minutes. A little bit of butter can add to the richness.

Tonight, I filled a Delicata with a wonderful mixture of fresh sauteed collard greens, onions, garlic, Hot Silva Linguica, and cooked winter wheat berries. A bit of grated Swiss cheese topped it off. This was a wonderful way to represent the bounty of the fall harvest season
.

Wednesday, October 6, 2010

Some Recent Meals

Oh, I know. What is the point of having a blog if you never bother to update it? Well, post-graduation, life took some getting used to. In addition to the new jobs, new apartment, and new car, there comes a new attitude. I think that I have now settled down a bit, and will be able to get back to cooking like I mean it. One interesting change is that I am not on a college budget anymore, so I am looking forward to creating a few dishes that really use some quality ingredients! Also, my job at The Cosmopolitan Hotel has brought cuisine back into my life, and working with fantastic people like Chef Amy DiBiase has given me new perspectives and ideas. Here are some pictures of a few dishes that I worked up during the summer:

Monday, May 24, 2010

Fresh Semolina Pasta


Making your own fresh pasta is rather simple, there are only a few rules of engagement if you want to have any success at using your noodle. One, make a volcano. Don't ask me why, it's just what you are supposed to do, and it's what every great Italian chef since Marco Polo brought the noodle home from China has done. Two, work with wet hands until you get the right moisture content in your dough. It's always better to work the water in, little by little, until you have it right. Three, use a pasta machine. Pasta dough is notoriously hard stuff to work with, but a small, hand operated roller will really go a long way when it comes to mixing and rolling out the noodle to the proper thickness. Here is a simple recipe for one man sized serving:

Fresh Semolina Pasta

1/2 cup all purpose flour
1/2 cup semolina flour1 egg
1/2 tbsp olive oil
1 tbsp tap water

Form the flour into a small volcano, and add the beaten egg, water, and oil to the center. Using a fork, stir the egg mixture into the flour, until you get a crumbly, dry dough.

Next, wet your hands one time, and begin to knead the dough, working until you get a soft ball that does not crumble apart. If your dough is still too dry, wet your hands one more time and continue kneading. Do this until the dough is the right consistency. It should be very rubbery, and should not be too wet. Next, form the dough into a long snake, roll it flat, and pass it through the pasta machine, set to the thickest setting. Fold it in half, and pass it through the machine again, and again, and again, and again, and again. Do it until the dough is smooth and uniform. Fold the edges towards the center, and pass it through the machine again. Then, flatten the noodle out by making one pass through the machine, decreasing the thickness (my machine has a little knob numbered 1 to 7) until you get to the desired one. My machine starts out at 7, and I take the noodle down to a 3 for spaghetti. Finish the noodle off with the cutting attachment, if you have one (if not, you have to go old school and use a sharp knife). Fresh pasta cooks very fast, so only give it about 5 minutes, then drain and toss into your favorite sauce! OK OK. I know. I am sure that you want to know why there is a jar of Safeway Select brand Artichoke and Pesto Pasta sauce in the picture above. Yes, it is true. Sauce out of a jar. Now, before you choke in horror, let me remind you that I am on a really strict budget, and I carefully considered making my own sauce, if it was economically the best choice. I was shocked to find that the already prepared generic brand sauces by Safeway actually cost less per ounce than crushed tomatoes! If it were only a matter of price, I would spend the 2 cents more per ounce for my own tomato base, and I would have created my own sauce, because I am also concerned with using only natural ingredients. Well, there is absolutely nothing unnatural in the Safeway sauce! No high fructose corn syrup, preservatives, or artificial anything. Now, I will say that I do NOT see pine nuts listed as an ingredient, and I don't know how you can say that you have a pesto sauce without them, so that part may be a bit of a little white lie on the part of the marketing department, but regardless, the sauce is good stuff, and I felt fine with it, and especially the $1.99 per jar price. Once the noodles were tossed into the sauce, topped with crumbled feta and paired with a nice blue cheese salad, there was no doubt. And take a look at the marginal cost!

Food Economics:

Eggs - $1.99 dz = ($0.498 for 1)
Bob's Red Mill Semolina Flour - 24oz bag $3.11 = ($0.259 2oz or 1/2 cup)
Gold Medal All Purpose Flour - 5# $3.99 = ($0.099 for 2oz or 1/2 cup)
Olive Oil = ($0.050 for 1/2 tbsp)
Safeway Select Artichoke and Pesto Pasta Sauce - 1 jar $1.99 ($0.995 for 1/2 jar)
Feta Cheese Crumbles - 3.5oz $4.39 = ($0.313 for 1/4 oz)


Grand Total = $2.21

Sunday, May 16, 2010

Pennete Fideo con Chícharos


It is rather cold and gray today, and after a grueling softball game where I mostly sat around spitting out sunflower seed husks, I was ready for a hot meal. Investigating the larder revealed very little that was useful. Yes, I did say larder. And no, there is no lard in there. A larder is a cool area for storing food prior to use. Larders were commonplace in houses before the widespread use of the refrigerator.

Essential qualities of a larder are that it should be:

  • as cool as possible
  • close to food preparation areas
  • constructed so as to exclude flies and vermin
  • easy to keep clean
  • equipped with shelves and cupboards appropriate to the food being stored.
So, now you know. Well, hidden somewhere in the larder was a can of Campbells Tomato Soup, a can of chicken broth, a can of peas, some pennete pasta, and assorted spices. In Mexican cooking, pasta is often used in a tomato based soup that is seasoned with cumin and oregano. Looks like I had the makings of a nice lunch, "estillo campesino". Here's how to make it.

Pennete Fideo con Chícharos

1 can condensed tomato soup
1 can sweet peas
1 can chicken broth (or 1 cup)
7oz pennete pasta
1/2 sweet onion
1/2 tsp cumin seed, crushed
1/2 tsp whole oregano
1/2 tsp paprika
1 tsp granulated garlic
pinch of fresh ground pepper
1 tsp salt
2 tbsp olive oil

Toast the pasta in the olive oil, stirring frequently until many of the noodles have browned in a stainless steel saucepan or pot over medium heat. Dice the onion and add to the pasta, cooking until the onion is slightly tender. Pour in the chicken stock (vegetable stock can be used if you want to make this a vegetarian dish). Pour in the can of condensed soup, followed by two cans full of water. Drain the peas and add to pot. Stir well. Turn the heat up to high. Add the spices and stir well. When the soup comes to a boil, reduce the heat to low, cover, and simmer for about 15-20 minutes, stirring occasionally. You can add water if you want a more liquid soup, but I prefer my fideos to almost be more like a stew.

**NOTE - there is no Food Economics for this one. I have no idea what the stuff cost that I found buried in my larder!

Tuesday, May 11, 2010

Bologna and Cheese Tortilla Scramble


Things have gotten pretty bad over at Chateau du Brockman, and lunchtime today presented a real challenge thanks to a rather dismal financial outlook and a fridge that was stocked with only an old package of meat bologna, a few eggs, one onion, some tortillas, American cheese slices, and fresh salsa. Is it humanly possible to create something edible while not spending any extra cash, using only these ingredients? I dare say so! I do not feel the need to give out the recipe as I am pretty sure that no mortal would attempt to re create this, but I have to show you the end result. Much to my surprise, it worked out rather well, and I actually enjoyed this...much more than you might think. The key was to cut the bologna, onion, and tortilla into thin strips and toast them all together until the tortillas were nice and crisp and the bologna was browned. This gives the scramble a nice texture. Then, the eggs bound it all together. Topped with the cheese and salsa, dare I say.....cest magnifique? OK, maybe not....but it beat the pants off a yuck meal #3 from the local fast place, and I cleaned my plate. Don't laugh.

Food Economics:

Eggs - $1.99 dz = ($0.498 for 3)
Fresh Salsa - 16oz tub $2.99 = ($0.186 1oz)
Corn Tortillas - 30ct $1.49 = ($0.149 for 3)
Large Sweet Onion - 1 $0.75 = ($0.093 for 1/8)
2% Cheese Slices - $2.79 12oz = ($0.349 for 2 slices)
Bologna - $0.99 16oz *on sale! = ($0.186 for 3 slices)

Grand Total = $1.46

Wednesday, May 5, 2010

Artichokes and Hollandaise Sauce


While cruising around aimlessly in the grocery store, trying to find something to eat, I noticed a few things. One, that I had no idea what I wanted. Two, that jumbo globe artichokes were on sale. Problem solved. The only other question, what should I sauce my nice, heavy, purple tinted thistle with? Usually, a glob of mayonnaise or some melted butter work just fine, as these spring treats do not need much help....but not today. I needed to go the extra mile, mostly because I was kind of bored and needed something to do. Taking a cue from a recent film that I saw that shall remain nameless (about food blogging, of all things), I knew that I needed to attempt a hollandaise to drown my chokes in. I will demonstrate a fail-safe and easy way to make a really nice sauce using a stick blender. It works like a charm, and the best part was that I could make half the normal amount so there was no waste!

First, prepare the artichoke. Cut off the stem, and cut the artichoke in half. This will allow it to cook faster. Place both halves, stem side down, into a small pot with about 2 inches of water. Cover, and cook for about 25-30 minutes, or until the leaves pull off easily. Prepare the hollandaise sauce about 5 minutes before the artichoke is done. Once cooked, using a spoon, scoop out the fuzzy part (the choke). Pour the hollandaise into the cavity that was vacated by the choke, and go to work!

Hollandaise Sauce (stick blender method)

2 egg yolks
1 tbsp lemon juice
4 tbsp melted butter (1/2 a stick)
1 pinch cayenne pepper
1 pinch salt

Take a bowl, half full of water and throw it in the microwave for a minute to heat up the water. Meanwhile, use the stick blender to whip the egg yolks and lemon juice up in a glass jar or some other sturdy glass container, until it almost doubles in volume. Begin to drizzle in the melted butter, one spoonful at a time while blending. Once all the butter has been whipped in, place the glass jar into the bowl of hot water, whip for about 30 seconds, and let it rest until you have the artichoke prepared. Drown the artichoke and eat!

Now, just in case you have never seen an artichoke bloom, well, here is a picture of one that I took while strolling around in the Pacific Beach community garden. The flower is an awesome, bright blue color, and with it's great big fuzzy crown it really is an amazing blossom. Almost a shame that most of these end up on a dinner plate.....almost.


Food Economics:


Artichoke - $1.50
Eggs - $1.99 dz = ($0.332 for 2)
Fresh lemon = $.89 ($0.445 tbsp of juice, or about half a lemon)
Butter - $2.99 16oz = ($0.374 for 4tbsp)
Pinch of Salt & Cayenne = ($0.050)

Grand Total = $2.70

Tuesday, April 27, 2010

Vegetarian Refried Black Eyed Peas Tacos


Sometimes I am glad that I throw things into a Crock Pot, because you never know when you are going to get hungry. A little known fact about the old electric slow cooker is that it was invented for cooking beans, and let me say that it does an admirable job of that. No soaking is required, and the beans turn out marvelous. I made a batch of black eyed peas a few days ago, and they will become the feature ingredient in some vegetarian tacos, since the little guys are really a bean and not a pea, they should make some great refried stuff. The recipe is pretty simple, and most of the magic happens in the Crock Pot.

Vegetarian Refried Black Eyed Peas Tacos

To make the beans...
Into the Crock Pot:

1 16oz package of Black Eyed Peas
1 red onion (finely chopped)
1 tsp cumin seed
1 tbsp mustard powder
1 tsp whole oregano
1 tbsp salt
1 tsp cracked pepper
3 cloves chopped garlic
2 quarts water

Cook the beans on high for about 6-8 hours, or until they are tender. Easy enough! Now you can enjoy the fresh beans, and store some in the fridge for later after they have cooled off. For the tacos, I am using some of the beans that have been hiding in the fridge for a few days.

To make the Tacos...

1 cup cooked Black Eyed Peas
1 tsp olive oil
3 corn tortillas
1 half avocado
3 tbsp fresh deli salsa
3 tbsp grated cheddar cheese

Fry the beans in a small pan with the olive oil, mashing them as they heat up, until you get a nice pasty refried bean. Toast the corn tortillas in a hot skillet ( a great tip is to dip them in water first, and use a non-stick pan ). Assemble the tacos! Beans first, then cheese so it can get melty on top of the beans, avocado slices, and fresh salsa! That's it!

I may update this post later with the economics, but I am sure it will come out to be very cheap per 3 taco serving.

UPDATE

Food Economics:

I am assuming (economics is always full of assumptions) that for one package of black eyed peas, I come up with 8 servings. Of course, I think that the cooked product actually yields more than this, but for now, it is a good assumption.

Black eyed Peas - 16oz $1.35 = ($0.168 1 serving)
Red Onion - $1 = ($0.125 1 serving)
Cheddar Cheese - 8oz bag $2.49 = ($0.311 1 serving)
Corn Tortillas - 30ct $1.49 = ($0.149 for 3)
Avocado - $0.99 each = ($0.495 for half)
Fresh Salsa - 16oz tub $2.99 = ($0.186 1oz)
All spices, olive oil = ($0.100 this is totally an estimate, since the spices and oil were all in my pantry already)

Grand total = $ 1.54 per 3 taco plate!

Monday, April 26, 2010

Blog Revisited - Cottage Wheat Bread

I suppose that it was inevitable that I would return to this blog in order to start yapping about my adventures in food. Let's face it, life really isn't worth talking about, especially since nobody really wants to hear about it. I guess that when life is good, so is the food, so let's leave it at that. My previous attempts to scribble about my life seemed rather fruitless. I went back and read my posts, and I was bored silly. I am now going to dedicate this blog to two things that I am sure I would be interested in going back to review. The food that I eat, and the dreams that I have. I will post more of both from now on.

It all started when my mother insisted on sending me an automatic bread machine. Made by Hitachi, she bought the latest and greatest in home appliance technology in 1994 for $150 bucks. I really didn't want the thing, and did my dog gone-est to avoid it, but somehow it ended up at my house. It has collected dust for quite some time, so I finally elected to get it out and make a loaf of bread, possibly the product of me trying to avoid my Sustainable Development reading by making some kind of attempt at being sustainable. Sure, baking my own bread. Way to go natural-like. Anyway, I flipped through the bread machine recipes and found one that sounded interesting. I have never heard of this type of bread, so it was worth a shot. "Cottage Wheat Bread", a delicious sounding mixture of wheat flour and cottage cheese. I will attempt to both list the recipe, ingredient cost, and total food cost for one loaf of bread. I am hoping that the food economics here will produce some interesting results. Here goes!

The Recipe
Cottage Wheat Bread - (from Fleischmann's Yeast Bread Machine Favorites)
For 1 pound loaf

2/3 cup milk
1/2 cup cream style cottage cheese1 tbsp butter or margarine
3/4 tsp salt
1 1/4 cup bread flour
1 1/4 cup whole wheat flour
1 tbsp packed brown sugar
1 1/2 tsp Fleischmann's Bread Machine yeast

The ingredients all go into the bread machine, in this order: First the milk, cottage cheese and butter. Then the dry stuff, waiting until the very end to add the yeast on top of the flour, making sure it does not go into the wet stuff. Bread machine is set to basic, light crust, and PRESTO.....off it goes. I will have an update in about 4 hours to let you know what it comes out like.

Food Economics:

Gold Medal Whole Wheat Flour - 5# bag - $3.69 = ( 6.5 oz = .300)
Gold Medal Better for Bread Flour - 5# bag - $3.49 = (6.5 oz = .284)
Fleischmanns Bread Machine yeast - 4oz jar - $8.99 = (1/4 oz = .561)
Imperial Margarine - 1# - $0.99 = (1 tbsp = .030)
Lucerne Whole Milk - 1/2 gallon - $1.99 = (2/3 c = .165)
Knudsen Small Curd Cottage Cheese - 16oz - $3.29 = (4oz = .822) or (.572)**
Brown Sugar - 2# - $2.69 = (3/8oz = .032)
Salt - 26oz - $0.99 = (1/4oz = .010)

Whew! So, there we have it. On the right side is the purchase cost, and in parenthesis, the actual ingredient cost based on the recipe. Add it all up and we get a total of.......

Grand Total = $2.20 per 1 pound loaf of bread !!

** - As you can see, by far, the biggest cost comes from the cottage cheese. I am a bit pissed about that, because the damn grocery store had things priced incorrectly! The cottage cheese should have been $2.29 (I check ALL of my prices). Not to split hairs, but this would have brought the actual cost per loaf down to $1.95. Well, since they screwed up, I can go back with my receipt, show them the shelf price, and guess what....they have to give me the item for free.

I will update this post in about 4 hours, when the bread is finished.

UPDATE

Well, exactly 4 hours and 10 minutes later, the machine beeped and the bread was ready. It was a cube shaped, heavy loaf with a rather hard crust. It smelled wonderful. I sliced it open, and to my surprise, it had a good consistency and looked a lot like, well, wheat bread.

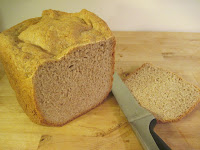
I buttered a slice, and well, it tasted a lot like wheat bread. I could not tell that there was any cottage cheese in it at all. There was no noticeable tang or cheesy flavor. On the good side, it was a very nice loaf, and I like that I can slice it to make nice thick pieces. On the bad side, it did not have any cottage cheese flavor, and well, that was the most expensive ingredient. Next time, I will shoot for some other kind of bread.....stay tuned.